Internal Frame Backpack Sizing & Adjustment HelpUpdated 3 months ago
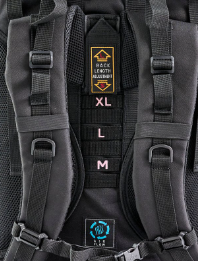
Our packs have the ability to be adjusted for different torso lengths. Most packs offer a M and L, and some go to an XL. These sizes are shown on the back of the pack, giving you the ability to adjust the pack to fit you comfortably. This feature is also helpful if you have a friend that needs to borrow a pack, but maybe they are a bit taller than you, it can be adjusted to fit them!
Know/measure your Torso:
Some TETON packs adjust as much as eight inches in the torso, so be sure to get a backpack that will fit your torso. When the pack arrives, adjust the height straps to match your torso dimension.
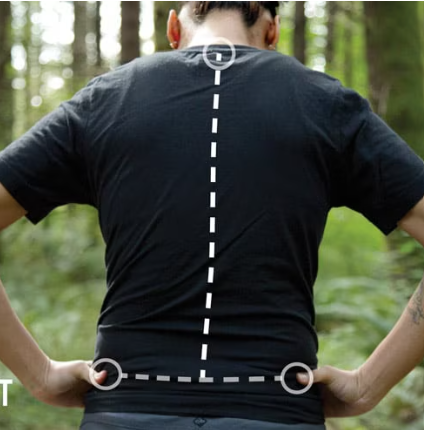
Take a measuring tape and start at the base of your neck (tilt your head down and find the most prominent bone). Then, put your hands on your hips and find the top of your hip bones. From the base of your neck, measure down the middle of your back to the top of your hip bones. This is your torso length.
Once you know your torso length, you can adjust the size on the back of the pack. We recommend trying one or two of the different sizes to see which feels more comfortable, there are straps in between the sizes as well to give you a range of options for maximum comfort. Here are some recommendations for where to start:
Torso lengths between 15" - 17" we recommend the "M" setting or lower. (Our Scout backpack is the only pack that goes as low as 15")
Torso lengths between 17" - 21" we recommend the "L" setting.
Torso lengths over 21" we recommend the "XL" setting. (Only available on the Explorer and Signal)
* our new signal backpack has these same settings, but it sits behind the back panel.
Additional adjustments to make:
Note: Put at least 20 pounds of evenly distributed weight in your pack before you do the next six adjustments. Filled/weighted packs fit differently.
Step 1: Loosen the shoulder, load lift, chest, and stabilizer straps. Put the pack on.
Step 2: Buckle the waist belt and tighten both sides evenly so the belt sits over the center of your hip bones. Most of the weight should rest on your hips.
Step 3: Pull the shoulder straps tighter so your pack moves close to your body.
Step 4: Buckle the chest strap, tighten and adjust it until it centers on your chest.
Step 5: Adjust the load lift straps so the weight of the pack is balanced between your hips and shoulders. Tighter straps place more weight on your shoulders; looser straps move the weight to your hips.
Step 6: Tighten the stabilizer straps to stop the pack from swaying as you walk. This will improve balance and help conserve energy.
To find your torso length, you will need a helper and a string or a cloth measuring tape.
- Step 1: Stand up straight and bend at the neck so your nose is pointing toward the floor. Ask the helper to locate the bone poking up in the back of your neck. This protruding bone is the top of the measurement.
- Step 2: Put your hands on your hips with your thumbs pointing behind you. The imaginary line that would be created if your thumbs touched each other is the top of the hip bone. This imaginary line is the bottom of the measurement.
- Step 3: Have the helper run the tape down the back of your neck along your spine, starting at the protruding neck bone, and stopping at the hip bone. Now you’ve got your torso length.
- Step 4: Now place the tape on the backpack measuring from the bottom of the lumbar pad to the adjustments. Set the pack to the closest webbing placement on your backpack.
The torso measurements for our packs is located on each product page under "specifications". Torso length tip: Our Scout backpacks are for shorter torso lengths, our Explorer packs are for longer torso lengths.
You may also find this video helpful: https://youtu.be/bhQxqPNF1Ag